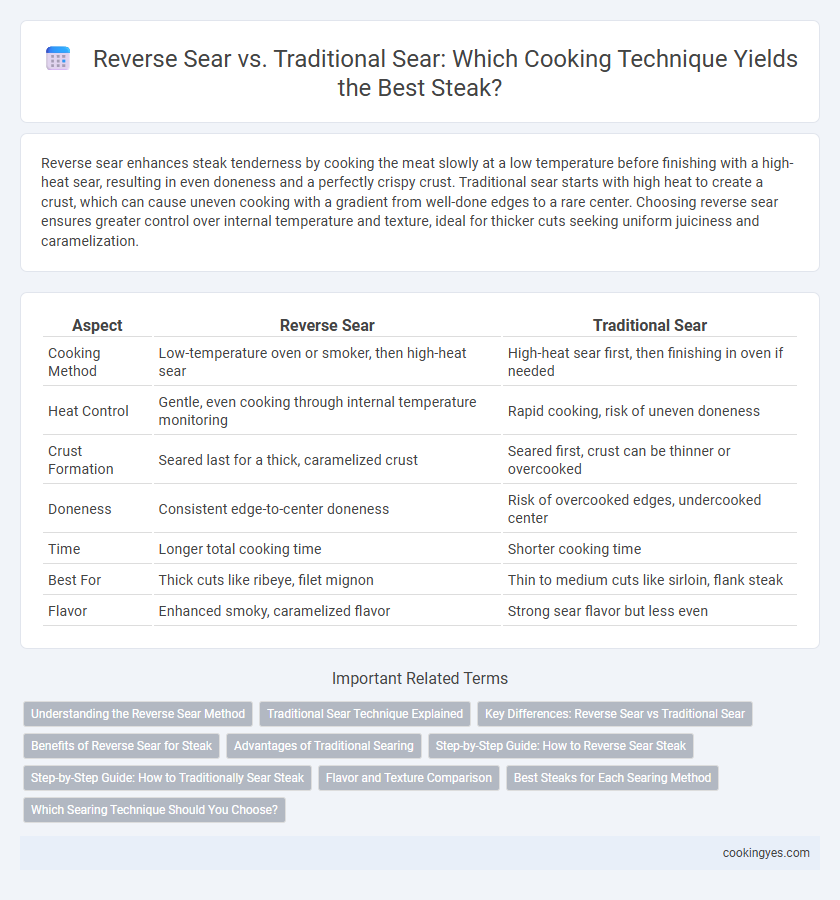
Reverse sear enhances steak tenderness by cooking the meat slowly at a low temperature before finishing with a high-heat sear, resulting in even doneness and a perfectly crispy crust. Traditional sear starts with high heat to create a crust, which can cause uneven cooking with a gradient from well-done edges to a rare center. Choosing reverse sear ensures greater control over internal temperature and texture, ideal for thicker cuts seeking uniform juiciness and caramelization.
Table of Comparison
| Aspect | Reverse Sear | Traditional Sear |
|---|---|---|
| Cooking Method | Low-temperature oven or smoker, then high-heat sear | High-heat sear first, then finishing in oven if needed |
| Heat Control | Gentle, even cooking through internal temperature monitoring | Rapid cooking, risk of uneven doneness |
| Crust Formation | Seared last for a thick, caramelized crust | Seared first, crust can be thinner or overcooked |
| Doneness | Consistent edge-to-center doneness | Risk of overcooked edges, undercooked center |
| Time | Longer total cooking time | Shorter cooking time |
| Best For | Thick cuts like ribeye, filet mignon | Thin to medium cuts like sirloin, flank steak |
| Flavor | Enhanced smoky, caramelized flavor | Strong sear flavor but less even |
Understanding the Reverse Sear Method
The reverse sear method involves slowly cooking the steak at a low temperature before finishing it with a high-heat sear, ensuring even doneness and a tender interior. This technique contrasts with the traditional sear, where the steak is cooked quickly over high heat from the start, often resulting in a less uniform temperature gradient. Reverse searing is ideal for thicker cuts, providing enhanced control over internal temperature and a perfect crust without overcooking.
Traditional Sear Technique Explained
The traditional sear technique for cooking steak involves placing the meat directly onto a hot skillet or grill to create a flavorful crust through the Maillard reaction. This high-heat method locks in juices by rapidly caramelizing the surface, resulting in a savory, textured exterior while maintaining a tender interior. Skilled chefs often prioritize temperature control and timing to achieve an ideal balance between crust formation and desired doneness.
Key Differences: Reverse Sear vs Traditional Sear
Reverse sear involves slowly cooking the steak at low heat first, then finishing it with a high-heat sear to develop a crust, while traditional sear starts with a high-heat sear followed by finishing in the oven or lower heat to cook through. Key differences include temperature control and even doneness; reverse sear provides more uniform cooking and reduces the risk of overcooking, resulting in a tender interior and crispy exterior. Traditional sear offers faster cooking but may create a gradient with a more pronounced gray band between the crust and the center.
Benefits of Reverse Sear for Steak
Reverse sear offers precise temperature control, ensuring even cooking from edge to center, which prevents overcooking and preserves juiciness. This method enhances the Maillard reaction, producing a deeply caramelized crust without sacrificing interior tenderness. Optimal for thick steaks, reverse searing combines slow roasting with high-heat searing to maximize flavor and texture contrast.
Advantages of Traditional Searing
Traditional searing creates a flavorful crust through high-heat contact, locking in juices and enhancing the Maillard reaction for rich taste and texture. This technique allows for a quick cook time on the stovetop, preserving tenderness and ensuring a caramelized exterior. Many chefs prefer traditional searing for its simplicity and the deep, savory flavor profile it imparts to steaks.
Step-by-Step Guide: How to Reverse Sear Steak
Begin by seasoning the steak with salt and pepper, then slowly cook it in an oven at 225degF (107degC) until it reaches an internal temperature of about 120degF (49degC) for medium-rare. Remove the steak and sear it in a hot cast-iron skillet with a tablespoon of oil for 1-2 minutes per side, creating a flavorful crust. Rest the steak for 5 minutes before serving to allow juices to redistribute and achieve optimal tenderness.
Step-by-Step Guide: How to Traditionally Sear Steak
To traditionally sear a steak, start by patting the meat dry and seasoning it with salt and pepper for enhanced flavor. Heat a heavy skillet, preferably cast iron, over high heat until smoking hot, then add a small amount of oil with a high smoke point such as canola or grapeseed oil. Place the steak in the pan without moving it for 2 to 3 minutes on each side to develop a deep brown crust, then reduce the heat and cook to desired doneness, finishing with a rest period to redistribute juices.
Flavor and Texture Comparison
Reverse sear enhances flavor by allowing the steak to cook evenly at a low temperature, preserving moisture and developing a rich, caramelized crust during the final sear. Traditional sear delivers a more pronounced crust early in cooking but risks uneven doneness and a less tender interior. Texture from reverse sear is consistently juicy and tender, whereas traditional sear often produces a gradient from well-done edges to a rare center.
Best Steaks for Each Searing Method
Reverse searing is ideal for thick-cut steaks like ribeye and filet mignon, as it allows for even cooking and a perfect crust without overcooking the interior. Traditional searing works best for thinner cuts such as sirloin or flank steak, providing a quick, flavorful crust while maintaining juiciness. Choosing the right method depends on steak thickness and desired doneness uniformity to achieve the best texture and flavor.
Which Searing Technique Should You Choose?
Reverse sear offers precise temperature control with a tender interior and a consistently crispy crust, making it ideal for thicker cuts of steak. Traditional sear heats the pan first for an intense, caramelized crust but risks overcooking the interior if not carefully timed. Choose reverse sear for even doneness and traditional sear for a quick, flavorful crust on thinner cuts.
Reverse Sear vs Traditional Sear for Cooking Technique Infographic