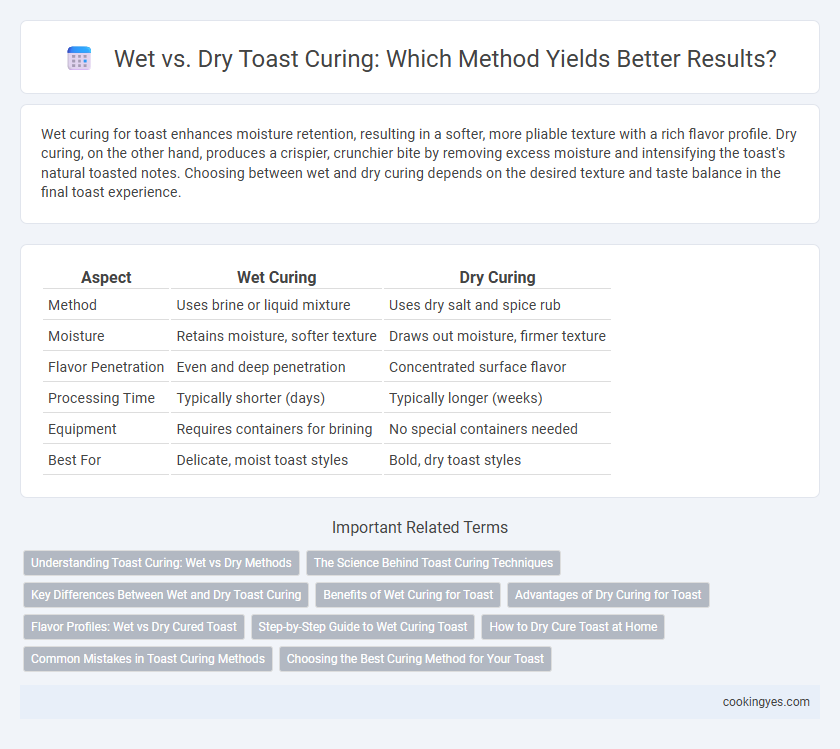
Wet curing for toast enhances moisture retention, resulting in a softer, more pliable texture with a rich flavor profile. Dry curing, on the other hand, produces a crispier, crunchier bite by removing excess moisture and intensifying the toast's natural toasted notes. Choosing between wet and dry curing depends on the desired texture and taste balance in the final toast experience.
Table of Comparison
| Aspect | Wet Curing | Dry Curing |
|---|---|---|
| Method | Uses brine or liquid mixture | Uses dry salt and spice rub |
| Moisture | Retains moisture, softer texture | Draws out moisture, firmer texture |
| Flavor Penetration | Even and deep penetration | Concentrated surface flavor |
| Processing Time | Typically shorter (days) | Typically longer (weeks) |
| Equipment | Requires containers for brining | No special containers needed |
| Best For | Delicate, moist toast styles | Bold, dry toast styles |
Understanding Toast Curing: Wet vs Dry Methods
Toast curing involves two primary methods: wet and dry, each affecting flavor and texture distinctly. Wet curing immerses the wood in liquid solutions to infuse moisture and additional flavors, ideal for producing milder, evenly flavored toast. Dry curing uses direct heat or smoke without added moisture, resulting in a more intense, crisp texture and robust flavor profile preferred in artisanal and traditional toasting techniques.
The Science Behind Toast Curing Techniques
Wet toast curing involves the application of moisture, which promotes Maillard reactions by facilitating heat transfer and uniform browning, enhancing flavor complexity and crust texture. Dry toast curing relies on direct heat exposure, inducing caramelization and crispness through moisture evaporation, resulting in a distinct crunch and toasty aroma. The interplay between moisture levels and heat exposure fundamentally influences the chemical transformations in starches and proteins, shaping the sensory qualities of toasted bread.
Key Differences Between Wet and Dry Toast Curing
Wet toast curing involves soaking wood chips or staves in liquid before toasting, which enhances the absorption of flavors such as vanilla and caramel by softening the wood fibers. Dry toast curing, on the other hand, applies direct heat without moisture, producing more intense smoky and charred flavors due to the higher temperature exposure. The key differences lie in moisture content, flavor profile intensity, and the chemical reactions within the wood during the toasting process.
Benefits of Wet Curing for Toast
Wet curing for toast enhances moisture retention, resulting in a softer texture and richer flavor profile. The infusion of brine or marinade during wet curing allows for deeper seasoning penetration, improving overall taste complexity. This method also helps maintain the toast's structural integrity by preventing excessive dryness during baking.
Advantages of Dry Curing for Toast
Dry curing for toast enhances flavor by allowing consistent salt absorption without moisture dilution, resulting in a crispier texture and prolonged shelf life. This method reduces the risk of bacterial growth during the curing process compared to wet curing, ensuring safer preservation. Dry curing also minimizes added water weight, maintaining the toast's structural integrity and allowing for more precise seasoning control.
Flavor Profiles: Wet vs Dry Cured Toast
Wet cured toast develops a richer, more intense flavor due to the infusion of spices and marinades that penetrate the bread, enhancing moisture and creating complex, savory notes. Dry cured toast offers a crispier texture with concentrated, robust flavors as the salt and seasonings draw out moisture and intensify the natural taste of the bread. Understanding the flavor profiles of wet versus dry cure methods allows for tailored toast experiences, from juicy and aromatic to crunchy and deeply seasoned.
Step-by-Step Guide to Wet Curing Toast
Wet curing toast involves soaking bread slices in a brine solution, enhancing flavor and moisture retention during the curing process. Begin by preparing a mixture of water, salt, and optional sugar or spices, then fully submerge the toast pieces for 1 to 3 hours depending on desired intensity. After curing, pat dry and toast as usual to achieve a balanced crispness with intensified taste profiles.
How to Dry Cure Toast at Home
Dry curing toast at home involves evenly coating the bread surface with a fine layer of seasoning or curing agents, then allowing it to air-dry in a low-humidity environment for several hours to achieve a crisp texture. This method preserves flavor concentration and extends shelf life by removing moisture without using liquids, preventing sogginess common in wet curing. Using dry heat settings in an oven or a food dehydrator at around 120degF (49degC) enhances the curing process, ensuring consistent drying and optimal toast quality.
Common Mistakes in Toast Curing Methods
Common mistakes in wet toast curing include over-saturating the wood, which leads to uneven flavors and longer drying times, while dry curing errors often involve insufficient moisture, causing the toast to crack or burn. Many overlook the importance of consistent temperature control during both methods, resulting in unpredictable char and flavor profiles. Proper monitoring of moisture levels and heat distribution ensures optimal toast curing, delivering balanced taste and texture.
Choosing the Best Curing Method for Your Toast
Wet curing enhances toast flavor by infusing moisture and seasoning directly into the bread, resulting in a tender interior with balanced taste. Dry curing uses salt or spices without added moisture, producing a crispier texture with concentrated seasoning on the surface. Selecting the best curing method depends on desired toast texture and flavor intensity, favoring wet curing for softness and dry curing for crunchiness.
Wet vs Dry for Toast Curing Infographic